Picture Proof Virtual Inspections Mobile Device Image Authentication

Picture Proof™ Virtual Inspections App

A Step-by-Step Guide to Protecting Yourself With Authenticated Photos

Contact Us

How to: Picture Proof Your Property

A Step-by-Step Guide to Protecting Yourself With Authenticated Photos. Follow these 4 Easy Steps!

PART 1: Getting Started

  1. Shortly after ordering a Picture Proof Virtual Inspection, you will receive a text message from Archetype Companies with a welcome message and a link to download our specialized app.
  2. Click the link and follow your phone’s instructions to install the Vision Camera app.
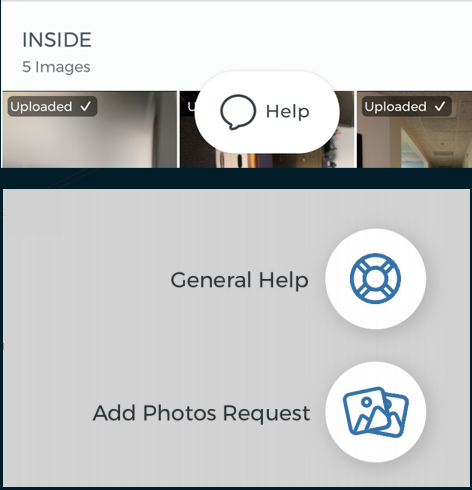
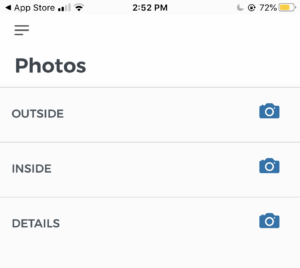
  3. Open the app and read through the on-screen instructions. After this, you will see a list of photo categories. These categories can help you organize your images for later use. Click any category to open the camera, and begin taking photos.

This link will remain active for 5 days. Take as many photos as you like during this period before ending the session.

Vision Camera - TRUEPIC Inc

(Mouse over to view)

PART 2: Using the App

Step2
  1. Tap to return to category list/view photos.
  2. Tap to switch photo categories.
  3. Toggle:
    • Flash
    • Front Camera
    • Video Mode
  4. Lock focus
  5. Tap to take a photo.
IMG_5124 - Copy
  1. Once you take photos, they will appear within their respective categories. These photos have a check-mark to signify that they have been uploaded to our system. Tap a photo to enlarge it and view more options.
  2. Tap the Camera Icon to continue taking photos within a given category.
  3. Tap “Finish Inspection” ONLY when you are COMPLETELY finished taking photos.
IMG_5132 - Copy (3)

Avoid taking blurry images. Blurry images cannot be authenticated.

IMG_5131 - Copy (3)

Once you are completely finished taking photos, make sure to end your session by tapping “Finish Inspection” and “I’m Finished”. You have 5 days to take as many photos as you like.

After you finish your session, you can ask questions or request additional photos by selecting the Help button.

PART 3: What to Photograph

Photograph an exterior overview of your property.

  • Take photos of each side of your building(s) from multiple angles. Try to capture the entire side of the building — including the roof and walls.
  • Collect photos of building details. On each side of your building(s), photograph features like windows, doors, shutters, sliding glass doors, etc. Photograph these features from multiple angles, and when possible, photograph labels with information such as model and serial numbers.
  • Photograph valuable outdoor features including perimeter fences, vehicle drives, parking lots, landscaping, boats, cars, outbuildings, swimming pools and equipment, air conditioning equipment, water well and treatment equipment, furniture, cooking equipment, etc.

Photograph the interior of your property, room by room.

  • In each room, take photos of the floor, ceiling, and all the walls from multiple angles.
  • Take photos of anything attached to those surfaces including light fixtures, fans, outlets, and electronic control modules (thermostats, home security systems, etc.).
  • Also include interior images of windows and doors, including sills, jambs, window heads, and any manufacturer labels.
  • Collect images of all furniture, fixtures, equipment, and other valuables before moving to the next room.

Collect images of prized possessions and documents, even if they are not monetarily valuable.

  • Take photos and make a list of important documents like personal photos, diplomas, passports, licenses, insurance policies, deeds, and titles. This list can help you organize and relocate these items to a safe location in the event of an emergency. You may not have time to do so later. Even if these documents are lost or destroyed, authenticated digital images can prove to be invaluable later.

PART 4: Storing Your Photos

Download and secure your images.

  1. Securely download copies of your Picture Proof authenticated photographs, and place them in a safe deposit box or other secure location. These images are retained in the cloud for three years, but you can update them more frequently to be safe.
  2. Consider storing original documents such as insurance policies, diplomas, licenses, deeds, titles, and other photographs in this secure location as well. We recommend attaching your Picture Proof photos to your insurance policy, so they are easy to locate later.
Satellite Image of a Hurricane Approaching Florida

Purchase the Picture Proof App Now!